
How to Organize Food Storage Containers and Lids
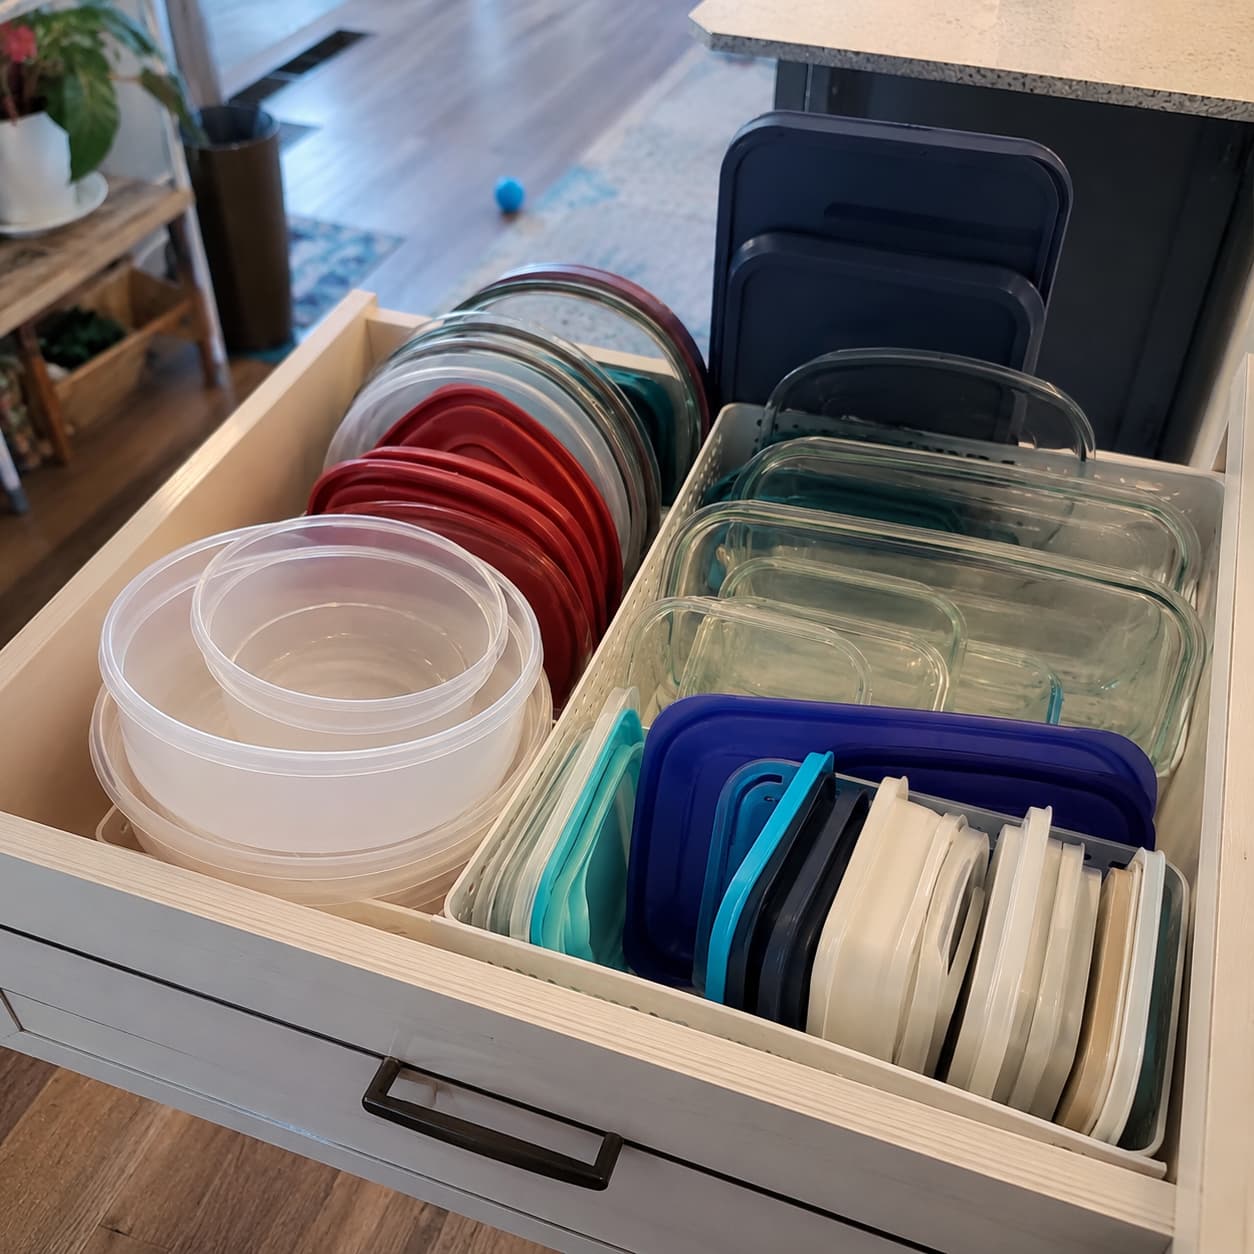
Most people fix a messy container cabinet by buying something — a bin, a rack, a stackable drawer system. It helps for about three weeks. Then the new organizer looks just as jammed as the old shelf did, because the tool was never the actual problem. The real issue is volume: a lot of kitchens are storing 40 to 60 pieces of plastic and glass when 15 to 20 would cover every real use, and no organizer holds an unlimited number of orphaned lids. The fix that lasts starts by cutting the collection down to a number the cabinet can hold without stacking, then storing what’s left so a lid and its base never have a reason to drift apart again. That’s a different project than “buy a bin,” and it’s the one that survives past the first week.
At a Glance
- Time required: 60 to 90 minutes for one drawer and one adjoining shelf
- Difficulty: Easy
- Cost range: $0 using what you already own, up to about $45 for a wire lid rack and a drawer divider
- What you’ll need: two temporary sorting bins, a vertical lid rack, an adjustable drawer divider (optional), painter’s tape and a marker
- Who this is for: anyone whose lid drawer needs two hands to close, or whose cabinet holds more mismatched pieces than complete sets
Why Your Cabinet Refills Itself Within a Week
A messy lid drawer isn’t really about mess. It’s about matching. Bases and lids naturally end up in different piles — lids stack flat because they’re thin, bases nest inside each other by size — and once they’re in two piles, there’s no structural reason a specific lid ever finds its way back to its base. You’re relying on memory, and memory loses to a drawer holding 40 or 50 pieces.
Cross-brand mixing makes it worse. Most kitchens hold containers from three to six sources collected over years — a big-box starter set, a few inherited pieces, whatever came free with a gift basket, a growing stack of deli and soup containers that felt too useful to toss. A lid from one brand will often sit on a base from another and look like it fits. It usually doesn’t seal. Rim widths are commonly off by an eighth of an inch to three-eighths of an inch — small enough that the near-miss looks plausible and gets kept “just in case,” large enough that it never actually works. A dozen near-misses like that is what fills a drawer with pieces that all look almost right and function for nothing.
What Actually Belongs in the System
You don’t need a full replacement system to start this, and you shouldn’t buy one yet.
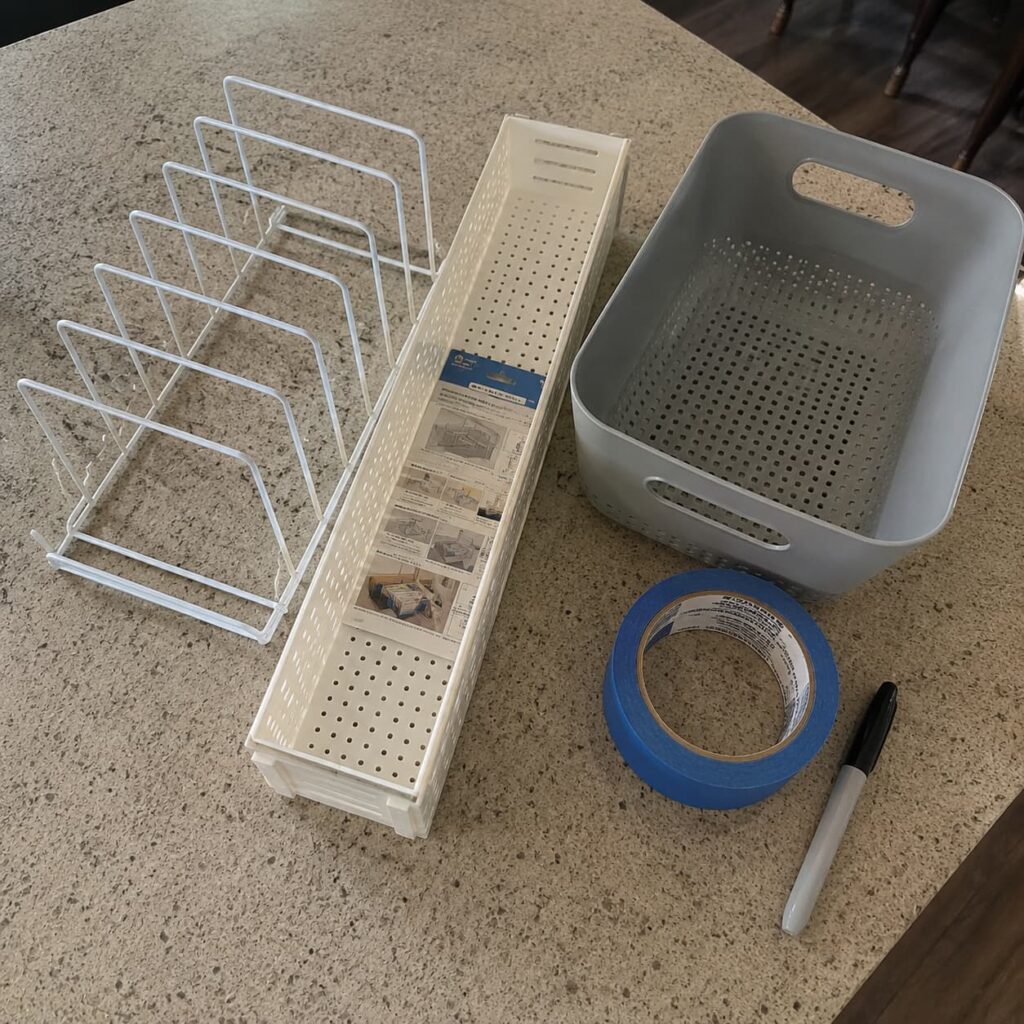
- Two temporary sorting bins. A laundry basket, a large mixing bowl, or an empty box works fine. Cost: $0 if you’re using what’s already around.
- A vertical lid rack. Anything with slots or a wire structure that holds lids standing up on their edge instead of flat. A dish drying rack turned on its side works in a pinch; a wire file-style organizer built for lids runs $8 to $22. For gallon-size round lids, which run about 8 to 9 inches across, make sure the rack is at least 8 inches deep front to back, or the largest lids will tip forward out of it.
- An adjustable drawer divider, if you’re organizing a drawer instead of open shelving. Spring-loaded versions that expand to fit the drawer width run $10 to $18 and need no hardware.
- Painter’s tape and a marker, for labeling shape groups as you sort. Under $5 combined, and most kitchens already have both on hand.
What not to buy yet: a large matched-set replacement system, the kind with 20-plus pieces for $30 to $50. Buying it before the purge means sizing it to the bloated collection you’re about to cut down, not the one you’ll actually keep.
The Reset, Start to Finish
Stage 1: Empty Everything Onto the Counter (10 to 15 minutes)
Pull every container and every lid out of the cabinet or drawer, no exceptions, and set them on a clear counter in two rough piles — containers in one, lids in the other. You’ll know it’s done when you can see the bottom of the cabinet; anything still inside hasn’t been through the sort yet. Skipping this while things stay stacked is the shortcut people take, and it’s the wrong one: pieces wedged in the back are usually the oldest, most mismatched ones — exactly what needs to go.
Stage 2: Pair Every Lid, Then Purge What’s Left (20 to 30 minutes)
Match each base to a lid that actually seals it, not one that just balances on top, and set matched pairs aside as you go. For anything left unmatched, run three checks: Does it have a lid right now, not “somewhere else in the house”? Is it stained, warped, cracked, or does it still smell after washing? Has it been used in the last six months? Anything that fails two of the three checks goes in the discard bin. Every remaining base should have a lid resting on it before you move to the next stage. The trap here is keeping a base “because the lid has to be here somewhere” — if it hasn’t turned up in this pass, it isn’t in this cabinet, and hunting through the rest of the kitchen defeats the point of the reset.
Stage 3: Group by Shape, Not by Size (about 10 minutes)
Sort the surviving matched sets into families — round, square, rectangular — instead of by big, medium, small. Shape decides whether pieces nest and whether lids are ever interchangeable within a group; size is secondary. Done this way, a stack of six round containers nests down to about 5 inches tall instead of the 15 to 18 inches it takes stacked at random. Where this goes wrong: folding in a slightly different round shape because it’s “close enough.” Two rounds that don’t nest flush against each other function as different shapes — keep them in separate small stacks instead of forcing one wobbly pile.
Stage 4: Stand the Lids on Their Edge (10 to 15 minutes)
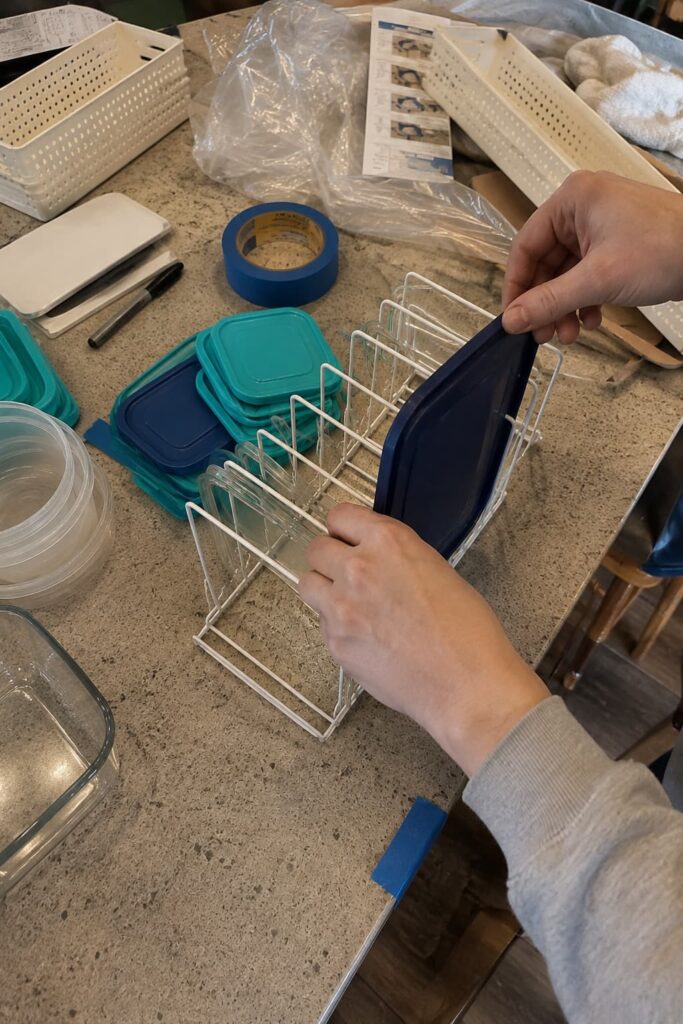
Load lids into the vertical rack standing up, arranged left to right by the same shape families from Stage 3, none stacked flat, not even a small pile. A lid is stored right when you can pull it straight up and out without disturbing the one next to it. Watch the slot width: anything looser than about three-eighths to a half inch lets thin lids slump sideways and re-stack inside the slot, which puts the drawer back where it started within days.
Stage 5: Put the Container Home Next to the Lid Home (5 to 10 minutes)
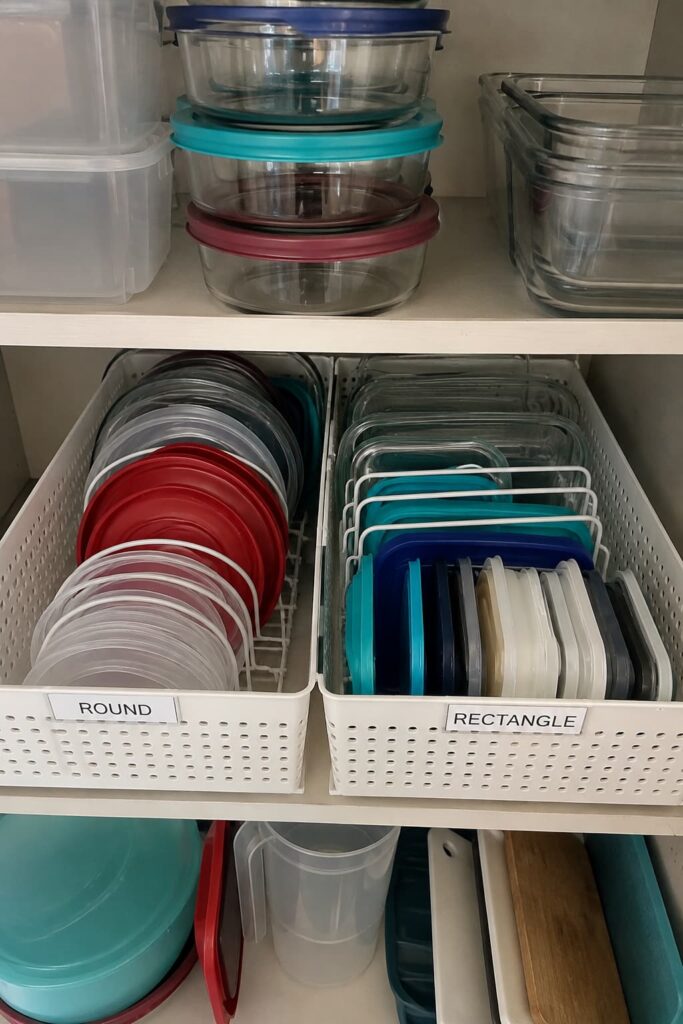
Store the sorted container stacks on the same shelf as the vertical lid rack, or in the same drawer — not in a cabinet across the kitchen. If a container and its lid can be grabbed together without opening a second door, this stage is working. Splitting containers and lids into separate spots because one fits a drawer and the other doesn’t is the single biggest reason re-pairing stops happening — a few extra steps is usually enough to make most people quit doing it inside of two weeks.
Stage 6: Set a Home for What Didn’t Make the Cut (about 5 minutes)
Any base that survived Stage 2 but doesn’t have a nested spot yet — usually an odd shape or an oversize piece — gets one designated spot, not general permission to float around the cabinet. Everything in the discard bin gets bagged for donation the same day; give it a week on the counter at most before it goes out with the trash instead. This stage is complete when the discard bin is empty, not “dealt with later” — letting it sit in the kitchen for weeks just turns it into the mismatched pile the reset was supposed to clear out.
Where It Falls Apart After the First Week
A finished cabinet doesn’t stay finished on its own. These are the points where it usually slips, and what stops each one.
- New containers arrive without a rule. Every takeout order, gifted candle jar, or hand-me-down adds a piece nobody purged. Set a cap for each shape family — say 8 rounds, 6 rectangles — and when a new piece pushes a group over that number, the oldest or most worn piece in that family leaves the same day.
- The vertical rack slowly refills flat. If slot gaps run too wide, lids slump sideways after a few weeks and stack inside the slot instead of standing edge to edge. Check the gap against your thinnest lid, and add a strip of folded cardstock as a spacer if a slot is loose.
- The rest of the household doesn’t adopt the habit. Putting a lid back in its slot takes about two seconds longer than tossing it on a pile, and after the first week most households default to whatever takes the least thought. Label the front edge of each shape group with a strip of painter’s tape — ROUND, RECT — so there’s no decision left to make.
- Freezer containers never got their own system. The cabinet gets sorted, but pieces that live in the freezer for meal prep get shoved into whatever drawer is closest, since there’s no cold-storage plan. Apply the same shape-family grouping to one labeled freezer bin, kept separate from the everyday set.
- Deli and soup containers sneak back in. They feel like free storage, so they get kept past any limit, even though most don’t nest with anything else and aren’t built for repeated freezer-to-microwave use. Cap these at 4 to 6 pieces, stored as a separate “soup and freezer only” group, not folded into the main shape families.
- The purge criteria get forgotten. The three-question check from Stage 2 works well the first time because it’s fresh. Six months later nobody remembers it, and the drawer creeps back toward chaos. Tape a small card with the three questions inside the cabinet door, and put a repeat reset on the calendar every 3 to 4 months, or right after any holiday that tends to send containers home with the leftovers.
Making It Work for Your Kitchen
- Small kitchen, no deep drawer: Mount a wire rack on the inside of a cabinet door instead, or stand a $6 dish drainer on its side on a shelf — both give the same upright lid storage without needing 8 inches of drawer depth.
- Bigger household: Raise the shape-family caps mentioned above — 10 rounds instead of 8, for example — but keep a smaller, separate cap for kid-size containers so a 1-cup lid doesn’t get treated as an orphan just because it doesn’t match the adult-size bases nearby.
- Tight budget: A $1 tension rod from a dollar store, mounted low in a cabinet, holds lids upright almost as well as a $22 rack. Sorting bins can be paper grocery bags instead of anything purchased.
- Renting: Stick to freestanding dividers and racks that use tension or simply sit in place — nothing that needs drilling or adhesive strips that could damage cabinet doors.
- Frequent meal preppers: Pull a dedicated subset of one shape family, usually 6 to 8 rectangular containers, and store it slightly apart from the general system so it doesn’t get grabbed for random leftovers and disappear into the back of the fridge for two weeks.
Common Questions About This System
What’s the best way to keep lids from sinking to the bottom of a pile? Store them standing up on their edge instead of flat. A wire rack, a repurposed dish drainer, or a tension rod mounted low in a cabinet all work, as long as the lids stay upright rather than stacked.
Should containers be organized by size or by brand? By shape. Round, square, and rectangular pieces nest with others in the same shape family regardless of brand, while size alone doesn’t tell you whether a lid will actually seal a given base.
How many containers does a household actually need? Most households of two to four people use 15 to 20 pieces regularly. Anything beyond that tends to sit unused until it turns into an orphan without a lid.
What should happen to containers that lost their lid? Repurpose a couple as dry-goods storage for rice, pasta, or dried beans, where a lid isn’t required, and donate or recycle the rest. Keeping more than 2 or 3 lidless pieces “just in case” is how the pile starts over.
Is it worth buying a new matching set instead of keeping what’s on hand? A mid-range 20-piece matching set runs about $25 to $40 and removes the cross-brand fit problem entirely. It only holds up long-term if the purge and shape-family sorting happen too — a matching set dropped into a disorganized cabinet drifts back to clutter just as fast as mismatched pieces do.
How often does this need to be redone? Every 3 to 4 months in a kitchen that sees regular use, or right after a holiday season, when gifted food and containers tend to show up.
Can glass containers be organized the same way as plastic? Mostly, but stack glass no more than 3 or 4 pieces high on a lower shelf. Glass doesn’t nest as tightly as plastic, and the added weight raises the risk of overloading a shelf or a piece slipping off a tall stack.
None of this requires containers you don’t already own. Most kitchens have exactly what the system needs — it’s just been stored in a way that’s worked against itself for years. The real test isn’t how the cabinet looks the day the reset is finished. It’s whether, three months from now, reaching in at six o’clock on a weeknight gets you a lid that fits the container already in your hand, on the first try, without digging. When that stops happening, that’s the signal to redo Stage 2 — not to buy another bin.
